
This section helps you block bots from spamming your website’s form. You can choose exactly which default WordPress forms you want to protect from brute force attacks, automated spam, and bot registrations.
To manage these settings, navigate to Threat Protection > Bot Protection > Google reCAPTCHA in your Ultimate Security Settings.
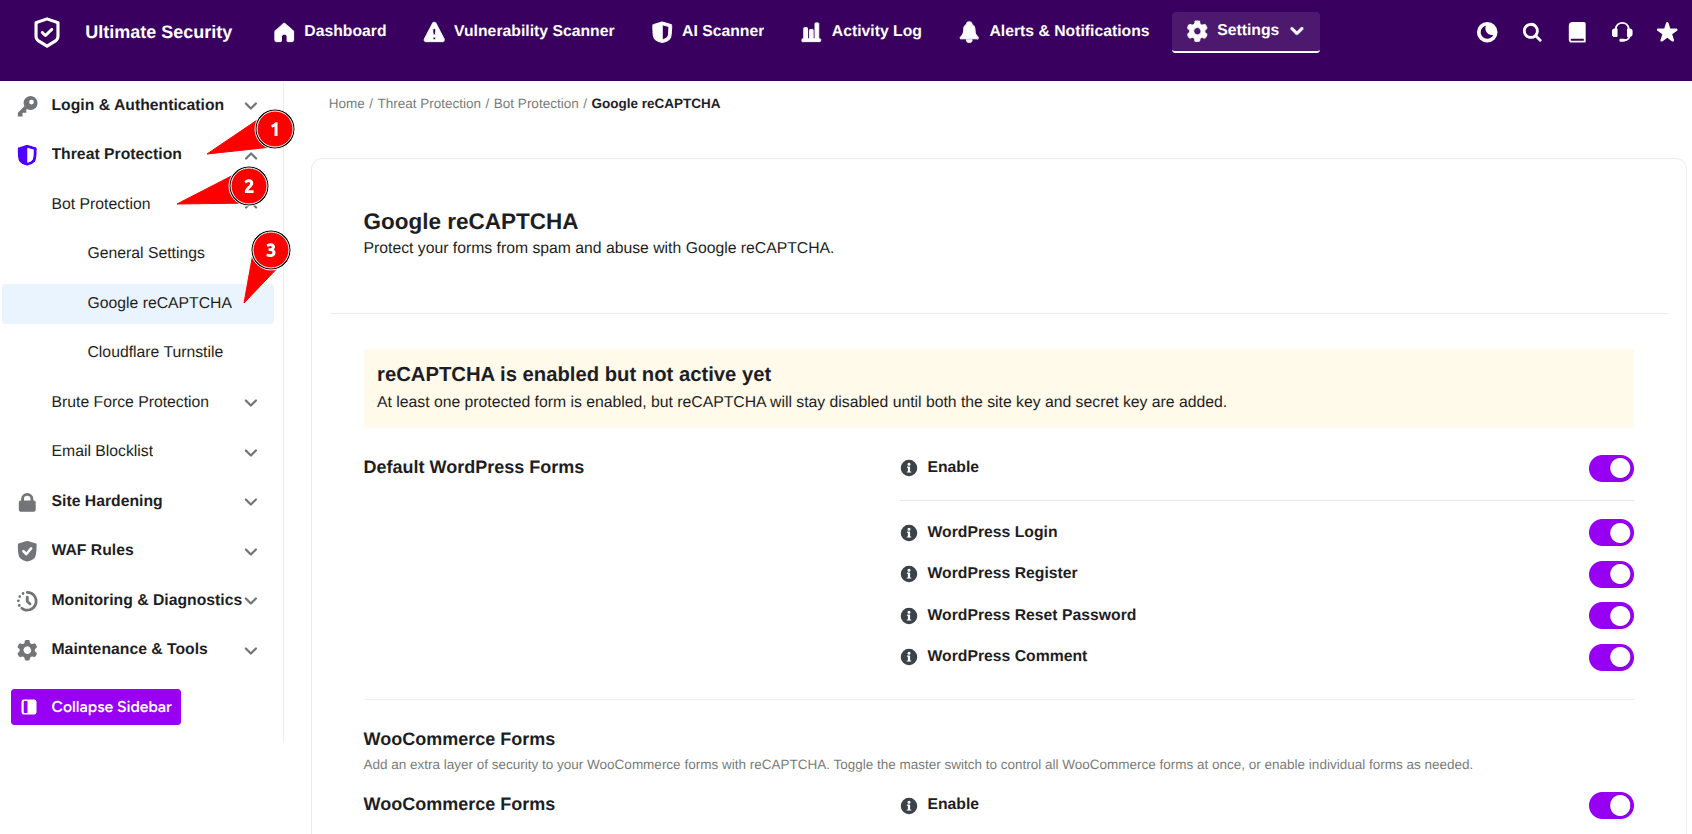
Default WordPress Forms
You can customize your security coverage by toggling protection for individual forms based on your site’s specific vulnerabilities. Simply flip the switches next to the forms you wish to shield from automated traffic.
- Enable (Master Toggle): Use this global toggle to quickly turn reCAPTCHA protection ON or OFF across all selected default WordPress forms simultaneously.
- WordPress Login: Toggle this on to add reCAPTCHA protection to your standard WordPress login page (
wp-login.php). This stops automated brute-force credential stuffing. - WordPress Register: Enable this to secure your user registration page. This is crucial for preventing malicious bots from creating thousands of fake user accounts on your site.
- WordPress Reset Password: Toggle this on to protect the “Lost your password?” form, preventing bots from spamming your users with automated password reset emails.
- WordPress Comment: Enable this to deploy reCAPTCHA on your standard WordPress comment sections, effectively blocking automated comment spam and trackbacks.
WooCommerce Forms
This setting enables reCAPTCHA across your WooCommerce store pages. You can turn on protection for all forms at once and then choose to enable it for specific, individual pages depending on your store’s security needs.
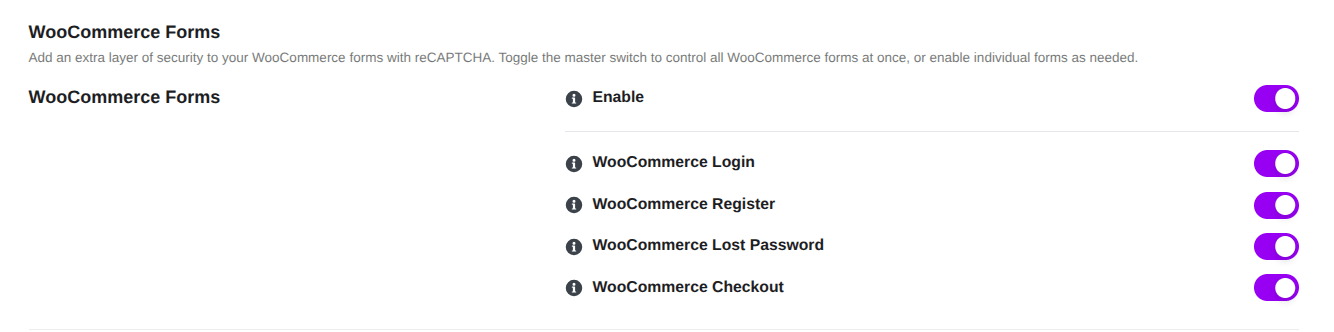
To set up this protection, follow these steps:
- Navigate to the Settings: Locate the “WooCommerce Forms” section
- Enable Master Control: Toggle the main “Enable” switch to activate reCAPTCHA for all WooCommerce forms simultaneously.
- Choose Specific Forms: If you prefer to enable protection for individual pages only, you can toggle the switches for the following forms:
- WooCommerce Login: Protects your customer login page.
- WooCommerce Register: Secures the account registration process.
- WooCommerce Lost Password: Adds security to the password recovery page.
- WooCommerce Checkout: Helps prevent fraudulent activity during the checkout process.
reCAPTCHA Version
You can choose between two versions of this method:

- v2: Usually shows the familiar “I’m not a robot” checkbox.
- v3: Works silently in the background without bothering your users unless it detects suspicious behavior.
Enter Your Keys (Site Key & Secret Key)
To make these features work, you need two special codes from Google.
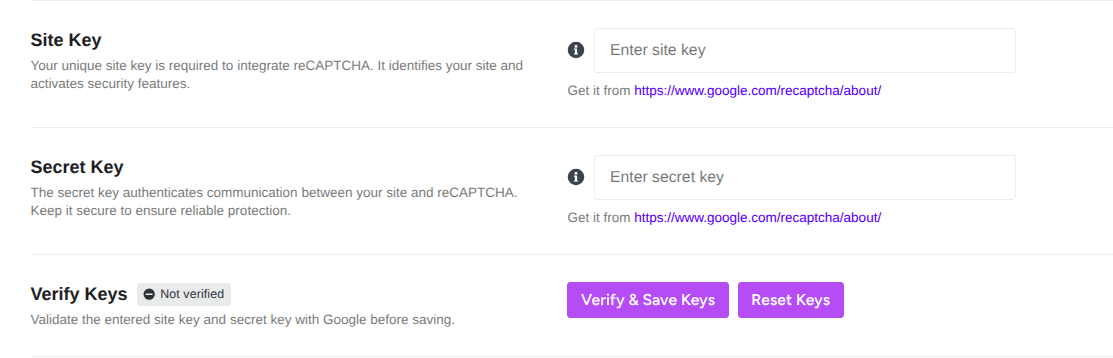
- Site Key: This is a public code that goes into your website’s form.
- Secret Key: This is a private code that stays on your server (in the plugin settings)
- Click the Verify & Save Keys button to validate your entered keys with Google to ensure the connection is active
- If you need to change your credentials, you can click the Reset Keys button to clear the current entries and start over.
Once the keys are verified, you will notice a Green Badge indicating “Verified.”
How to fill this out:
- You will need to get these keys for free from the Google reCAPTCHA website.
- Once you have them, copy and paste the “Site Key” into the first box.
- Copy and paste the “Secret Key” into the second box.
General Settings
The General Settings section allows you to customize how the reCAPTCHA widget looks and behaves on your website.
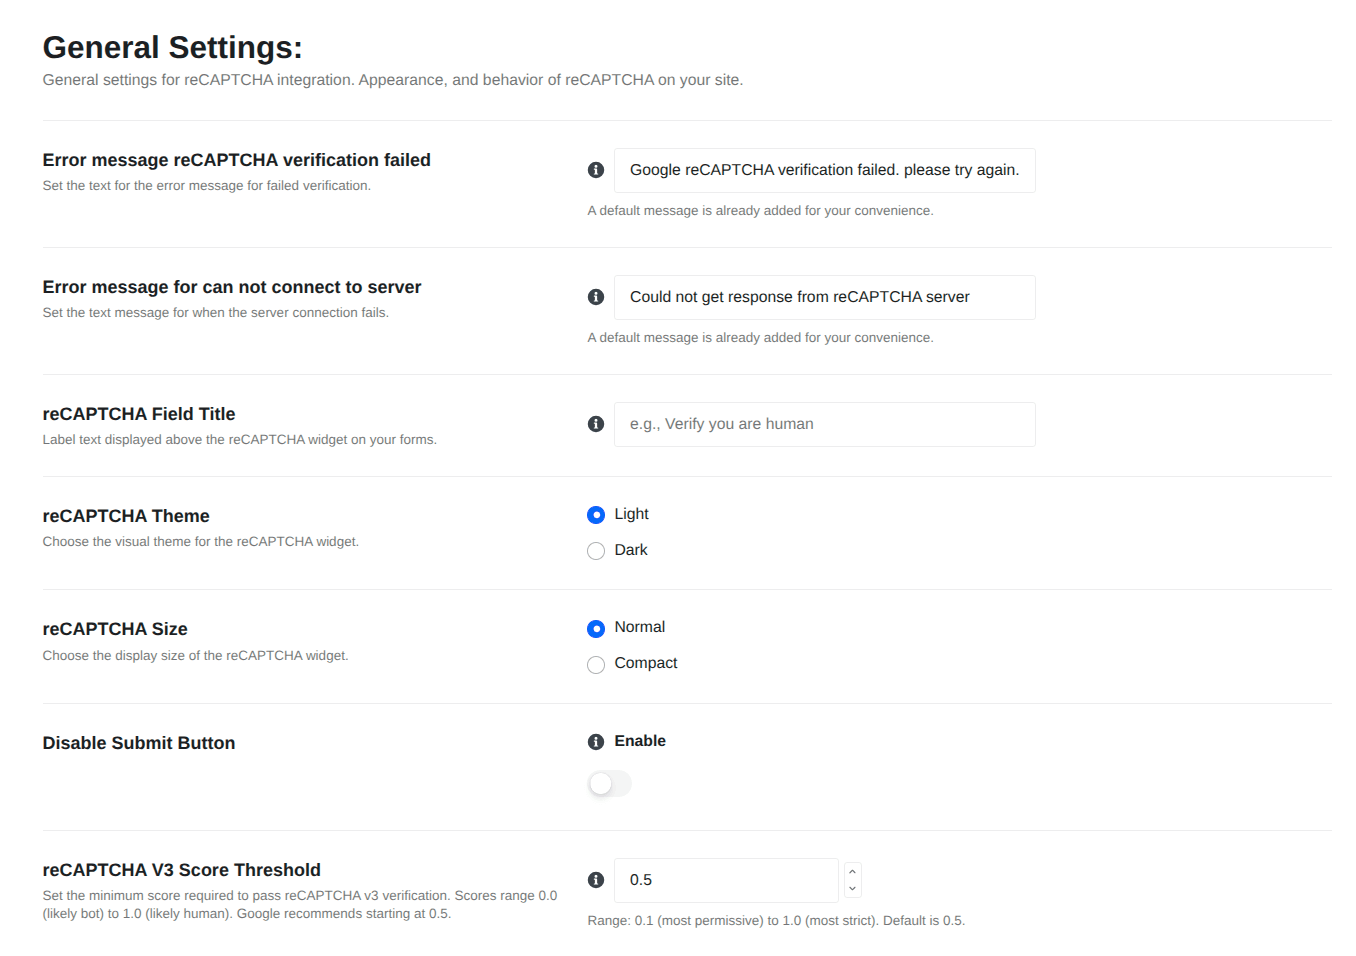
You can customize these options as follows:
- Error Messages: You can set custom text for when verification fails or when there is an issue connecting to the server. Default messages are pre-filled for your convenience.
- reCAPTCHA Field Title: Enter the label text you want displayed above the reCAPTCHA widget on your forms (e.g., “Verify you are human”).
- Visual Appearance:
- reCAPTCHA Theme: Select either “Light” or “Dark” to match your website’s design.
- reCAPTCHA Size: Choose the display size of the widget, either “Normal” or “Compact”.
- Disable Submit Button: Use this toggle to enable or disable the submit button until the reCAPTCHA verification is complete.
- reCAPTCHA V3 Score Threshold: Set the minimum score required to pass verification. The range is from 0.1 (most permissive) to 1.0 (most strict), with a default of 0.5. Google recommends starting with the default value of 0.5.
Whitelist Settings
Whitelist settings allow you to bypass reCAPTCHA verification for trusted entities, ensuring a seamless user experience for your team, loyal customers, or specific automated integrations without compromising your site’s overall security.
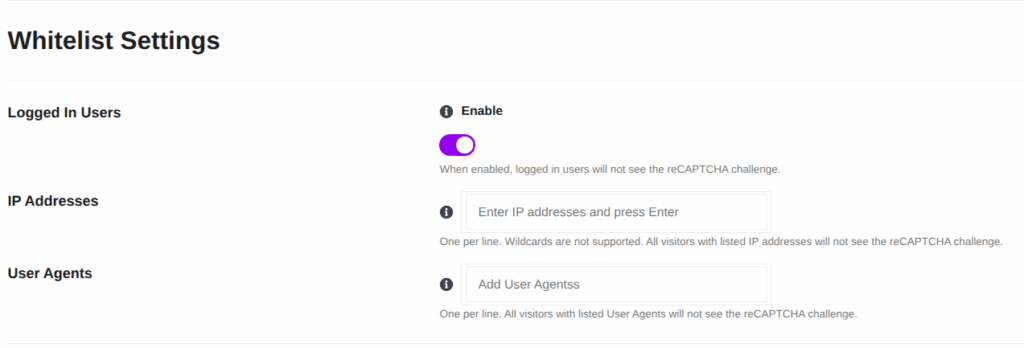
You can exclude specific users, network configurations, or browsers from seeing the reCAPTCHA challenges.
Whitelist Configuration Options
- Logged In Users: Toggle this switch to instantly bypass reCAPTCHA challenges for any user who is already authenticated and logged into your WordPress site. This prevents internal team members or registered subscribers from being repeatedly interrupted by security checks.
- IP Addresses: Enter trusted IP addresses into the text field (press Enter after each one to separate them). Input one IP address per line. Note that wildcards are not supported. Any visitor accessing your site from these specific IP addresses will bypass the reCAPTCHA challenge entirely—ideal for pinning office networks or dedicated developer IPs.
- User Agents: Enter specific browser or bot User Agent strings into this field, entering one per line. Visitors or web scrapers utilizing matching User Agents will not be prompted with the reCAPTCHA challenge. This is highly useful for allowing trusted internal tools, specific APIs, or search crawlers to access forms smoothly.
reCAPTCHA Logs
The reCAPTCHA logging feature allows you to monitor and audit Google reCAPTCHA verification attempts across your website forms. It acts as an essential debugging tool if users report submission errors or if you suspect API authentication failures.
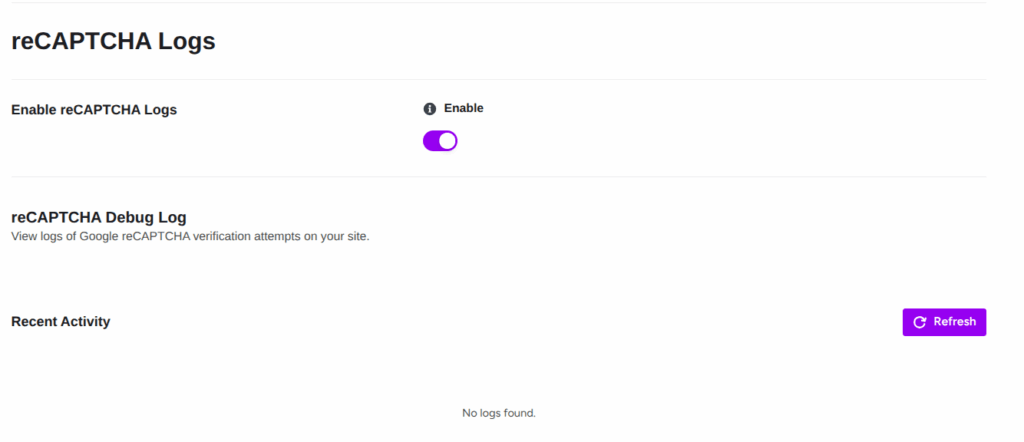
Debug Log Settings
- Enable reCAPTCHA Logs: Toggle this switch to activate or deactivate the logging system. When enabled, WP Ultimate Security will begin recording validation request payloads, server responses, and failure statuses.
- Recent Activity: This real-time console displays a chronological feed of recent reCAPTCHA verification attempts. If no form submissions have occurred since activating the logs, it will display a “No logs found.” message.
- Refresh Button: Click the purple Refresh button on the right side of the screen to manually pull the latest validation events and update the data log view instantly without having to reload the entire WordPress admin dashboard.
Note: Once you are happy with your settings, scroll to the bottom and click the blue button that says Save Changes. If you made a mistake and want to go back to how things were before you started editing, click Discard Changes
How to Check if it’s Working
After you click Save Changes, it’s a good idea to make sure the protection is active on your site. Follow these two simple steps:
Step 1: Open your site in a “Private” window
Since you are already logged in as an Admin, the security check might not show up for you. To see what your visitors see:
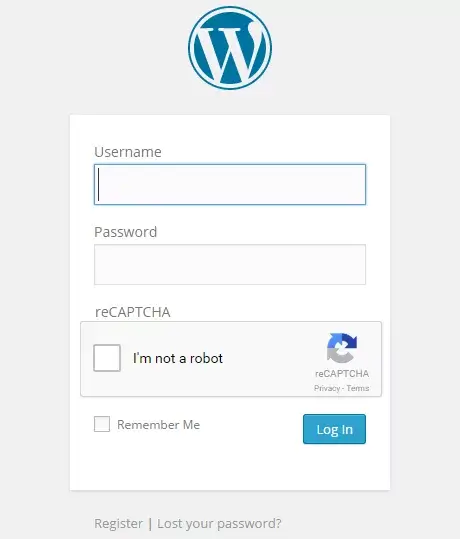
- Open a new Incognito or Private window in your browser (usually by pressing Ctrl + Shift + N).
- Go to your website’s admin login page.
- Look for the Google reCAPTCHA box (or the small blue badge in the bottom corner of your screen).
Step 2: Try to log in without the check
To make sure the shield is actually blocking bots:
- Type in a random username and password.
- Do not click the “I’m not a robot” box.
- Click the Login button.
- Your website should stop you and show a message like “Please complete the CAPTCHA” or “Security check failed.”
If you see that message, congratulations! Your site is now protected from automated bots.


