Bot Protection
reCAPTCHA Settings
This section helps you block bots from spamming your website’s form. It uses a tool from Google to check if a real person is trying to submit the form.
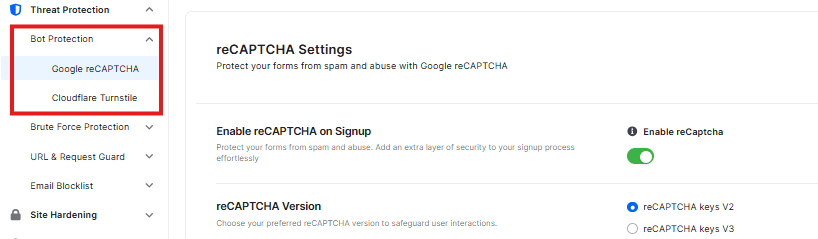
Enable reCAPTCHA on Signup
- There is a switch labeled “Enable reCAPTCHA” to control this feature.
reCAPTCHA Version
You can choose between two versions of this method:

- v2: Usually shows the familiar “I’m not a robot” checkbox.
- v3: Works silently in the background without bothering your users unless it detects suspicious behavior.
Enter Your Keys (Site Key & Secret Key)
To make these features work, you need two special codes from Google.

- Site Key: This is a public code that goes into your website’s form.
- Secret Key: This is a private code that stays on your server (in the plugin settings) to verify the check.
How to fill this out:
- You will need to get these keys for free from the Google reCAPTCHA website.
- Once you have them, copy and paste the “Site Key” into the first box.
- Copy and paste the “Secret Key” into the second box.
reCAPTCHA verification failed

- Use this box to change the message people see when they fail the security check. This message appears if someone gets the puzzle wrong or if the system thinks they are a robot. A default message is pre-filled in the text box, but you can overwrite it with your own custom text.
Can not connect to server

- Use this box to write a message for when the security check doesn’t work. This error might show up if your internet is down or if a security setting is stopping the connection. There is already a default message here, but you can change it.
reCAPTCHA Field Title

- This setting allows you to change the text label that appears above the checkbox on your form. The default text is already set. You can change it too.
reCAPTCHA Theme

- You can select Light or Dark theme based on your preferences
reCAPTCHA Size

- You can select Normal or Compact size based on your preference
No-Conflict Mode

- Enable No-Conflict Mode to prevent conflict from other themes or plugins and ensure your system runs smoothly.
WooCommerce Registration
If you are running an online store, enable this feature to secure your customer signup process.

- Enable reCAPTCHA on Signup: Toggle this to ON.
This adds a security verification to the registration page during checkout, preventing automated bots from creating fraudulent customer accounts.
Note: Once you are happy with your settings, scroll to the bottom and click the blue button that says Save Changes. If you made a mistake and want to go back to how things were before you started editing, click Discard Changes
Cloudflare Turnstile
This guide will help you set up and use the Cloudflare Turnstile plugin. This keeps your website safe without making it hard for your visitors

Default WordPress Forms
These settings determine where you want to use Cloudflare

Enable toggle activates the following settings:
- WordPress Login
- WordPress Register
- WordPress Reset Password
- WordPress Comment.
Your Keys
Put those keys into the field.

- “Site Key” field. Paste your Site Key here.
- “Secret Key” field. Paste your Secret Key here.
General Settings
These settings control how the Turnstile check looks and works on your site.

- Theme: You can choose between “Light” and “Dark” themes. Pick the one that matches your website’s look.
- Language: You can let the plugin automatically detect the language, or you can choose a specific language for the Turnstile check.
- Disable Submit Button: This option can stop people from submitting a form until they pass the security check. It’s usually a good idea to leave this “Enable.”
Advanced Settings
These are for more experienced users, but you can still use them

- Widget Size: Choose the size of the security check.
- Appearance Mode: Choose when the security check appears. “Always” means it will always be there.
- Defer Scripts: This can make your website load faster. It’s usually best to leave this “Enable.”
- Custom Error Message: If someone fails the security check, you can show them a special message. The default is “Please verify that you are human.”
- Extra Failure Message: Add another message if the check fails. It’s usually best to leave this “Disable.”
Whitelist Settings
This lets certain people skip the security check.

- Logged In Users: If you “Enable” this, people who are logged into your website won’t see the security check.
- IP Addresses: You can add IP addresses here. If you add an IP address, anyone using that address won’t see the security check.
- User Agents: You can add “User Agents” here. This is like a browser’s name. If you add a User Agent, anyone using that browser won’t see the check.
- Turnstile Logs: If you “Enable” this, the plugin will keep a record of when the security check is used.
Don’t forget to click the “Save Changes” button at the bottom of the page.
Brute Force Protection

Login Attempts
This Setting helps you stop automated robots from guessing your password.

Login Limit
- This is the main switch that activates the protection.
Login Attempts
- This tells the plugin how many times someone is allowed to type the wrong password. If someone guesses wrong 4(the default) times, we immediately block them.
Lockout Duration:
- This is how long the person is “put in timeout” after guessing wrong too many times. They will have to wait certain time before they can try again.
Increase Login attempts:
- If the same person gets locked out in hours, the plugin decides they are a serious threat and gets tougher.
Increase Lockout Duration:
- Once they are marked as a serious threat, we Increase Lockout time in hours after first lockout.
Retries Reset Duration:
- Sometimes a real user just forgets their password. This setting tells the plugin: If they haven’t tried to log in for a particular hour, forget about their past mistakes and let them start fresh.
Block Users

- Stop a specific person from logging into your website.
- In the input box, type the exact username of the person you want to block.
- Select All: Click this if you want to highlight every user currently on your blocked list at the same time.
- Remove All: Click this to clear the entire list and unblock everyone.
Recovery URL
Use this link if you ever get locked out of your account. So please keep it private and store it somewhere safe offline

Please follow these steps carefully:
- Generate Key: Click the Generate Key button. The plugin will create a secret link just for you.
- Copy: Click the Copy button to save that link to your computer’s clipboard.
- Save It Somewhere Safe: This is the most important step. Paste that link into a document on your computer, write it in a notebook, or save it in a password manager.
- ⚠️ Important Warning: Do not lose this link. If you get locked out, this is the only way you can get back in to manage your site. Keep it private and do not share it with anyone.
NOTE: Once you have these settings how you like them, click Save Changes
Lockout Notifications

The switch controls the configuration setting

Notification Email
- Enter the email address where you want to receive these alerts.
- After you type your email, click “send text” button. It will send a test email to make sure everything is working correctly. Check the Spam folder if it’s not found in the inbox
Notify On

User Lockout
Sends an email when someone is blocked for trying the wrong password too many times.
Extended Lockout
Sends an email when a persistent hacker is blocked for a long time (usually because they kept trying to break in).
Recovery URL Used
Sends an email if someone uses the secret “Emergency Unlock Key.”
Email Rate Limit
If your site is under attack, you might get hundreds of alerts in a few minutes. This setting stops that. It limits the emails to 10 (default) per hour. This way, you stay informed, but your inbox doesn’t get completely clogged up.
Once you have your email address set and your choices made, click Save Changes at the bottom of the page.
Locked Users

This table shows users locked out for too many login failures. You can unlock them manually here
At the top of the list, you will see tabs labeled “All,” “Phase 1,” and “Phase 2.” These simply separate users based on how long they are locked out for.
- All: Shows everyone combined.
- Phase 1: These are people who made a few mistakes. They are locked out for a short time (like 10 minutes).
- Phase 2: These are people who kept trying to break in. They are “Serious Offenders” and are locked out for a much longer time.

Manually Unlocking a User
Sometimes, a real person might forget their password and get locked out by mistake. If this happens, you can let them back in early.
- Step 1: Find the username in the list and check the box next to their name.
- Step 2: Look for the box that says “Select Option.” Click it to open the menu.
- Step 3: Choose “Unlock selected users” from the list that appears.
- Step 4: Click the blue “Apply” button.
The user will be able to log in again immediately after you do this.
Other Tools
- Search Box: If you have a long list, type a username here to find them quickly.
- Refresh: Click this if you want to update the list to see the very latest status.
URL – Request Guard
Enable URL Guard

At the top, you will see a switch labeled Enable URL Guard.
- What it does: When this is turned ON (showing blue/green), your site is actively protected against common attacks that try to sneak in through URLs.
Request Methods
This section lets you choose “how” information is sent to your website.

- The Default: Most websites only need the standard methods (like GET and POST) to work perfectly. The plugin handles this automatically.
- The Dropdown Menu: You will see a list that includes options like PUT, PATCH, DELETE, etc.
⚠️ Important Warning:
- If you select methods other than the standard ones (like PUT or PATCH), you might accidentally lock yourself out of your own website dashboard.
If this happens: You would need to delete a specific log file in your database to get back in. It is much safer to leave this setting on its default options!
IP Whitelist Bypass
Think of this as your “VIP List.”
- What it does: If you add an IP address here, the URL Guard will never block that person, no matter what.
- Why use it: This is useful if you have a specific office computer or a developer who needs access to the site and you want to make sure they never get stopped by the security guard by mistake.

Log Retention
This setting decides how long the plugin remembers (keeps a record of) the attacks it stops.
- The plugin will save a history of blocked requests for a month.
Save and Clear
Always click this button if you make any changes to the settings above.
Request History
This page keeps a list of the requests (visits) that your plugin has checked.
Dashboard Stats (At the Top)
Right in the middle of the screen, you will see two big numbers. These give you a quick “health check” of your site’s traffic.
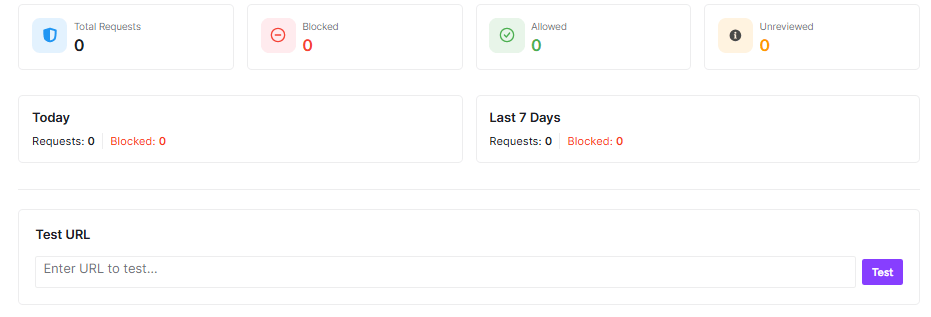
- Today’s Requests
- Requests in Last 7 Days
- Test URL
The Request Logs Table
Below the numbers, you will see a detailed table. This is the main record of specific events. Here is what each column means:

- Path
- Query Params
- Date
- Status
Navigating the List
If you have a lot of logs, you won’t be able to see them all on one screen.
- Look at the bottom of the table. You will see buttons like <** and **> or page numbers (e.g., Page 1 of 5).
- Click these to flip through the pages of history, just like turning pages in a notebook.
Managing Your Logs
If your list gets too long, or if you just want to clean things up, you can manage the data here.
- Delete: You can select specific items (or all items) and delete them. This is useful if you want to clear out old records to make the list easier to read.
- Refresh: If you are waiting to see new activity, click the refresh button to update the list.
Note: It is a good idea to check this page every now and then. If you see the same strange “Path” showing up many times in a row, it might mean someone is trying very hard to find a way in
Query String Filtering
This page is where you can set up specific “Banned Words” or codes for your website’s links. It sounds technical, but the idea is simple: if you know a specific code that hackers use, you can tell the plugin to block it instantly.
Here is a guide to using this page.
Query String
Before you use this page, it helps to know what we mean by “Query String.”

- Think of a URL (a web address) like a letter sent to your website.
- Sometimes, that letter has a P.S. at the end, like ?id=123 or ?search=shoes.
- That part after the question mark is the Query String.
Hackers often try to hide dangerous codes inside this “P.S.” section. This page helps you catch them.
Adding a New Rule
In the middle of the page, you will see a large empty text box.
- How to use it: If you have a specific code or text string that you want to ban (for example, a suspicious word you found in your logs), type it into this box.
- Submit: Once you have typed the code, click the Submit button.
- What happens next: The plugin will remember this code. If anyone tries to use it in a link on your site, the plugin will block them immediately to keep you safe from things like SQL Injection (a type of attack).
The Query Strings List
Below the input box, there is a section that lists all the rules you have created.
- Current Status: Right now, it says “No Query Strings found.”
- What this means: You haven’t added any banned words yet, so the list is empty. This is perfectly normal!
- Future Use: As you add rules using the box above, they will appear here in a list. You can come back to this list later if you want to delete old rules you don’t need anymore.
This page gives you extra control. While the plugin does a lot of work automatically, this feature lets you say, “Block THIS specific thing, no matter what.” It is a powerful tool to stop specific attacks that target your website.
User Agent Filtering
This page helps you stop bad robots and annoying crawlers from visiting your website. To understand how this works, imagine that every visitor to your site is wearing a Name Tag.

What is a “User Agent”?
In the computer world, a “User Agent” is just that: a digital name tag.
- When a real person visits your site using Google Chrome, their name tag says something like “Chrome Browser.”
- When a search engine (like Google) visits your site to read your pages, their name tag says “Google Bot.”
However, some bad robots wear “fake name tags” or use specific names to try and sneak in. This page lets you ban specific name tags.
Blocking a Bad Bot
In the middle of the page, you will see an empty box and a Submit button. This is where you tell the plugin which name tags to ban.
- How to use it: If you know a specific name or keyword that a bad bot uses (for example, a tool that scrapes content or spams your site), type it into this box.
- Why use keywords: You don’t always need the exact name. You can type just a part of the name. If a bot’s name tag contains that word, it will be blocked.
- Submit: After typing the word, click the Submit button to add it to your block list.
The User Agents List
Below the input box, you will see a section labeled User Agents.
- Current Status: It currently says “No user agents found.”
- What this means: You haven’t added any bots to your block list yet. This is completely normal!
- Future Use: Once you start adding rules using the box above, they will appear in this list. You can look here anytime to see exactly which name tags you have banned.
Time Filters (Today, Past 7 Days)
Above the list, you will see options to filter by time, such as Today or Past 7 Days.
- What they do: These buttons act like a pair of glasses that help you focus on a specific time period.
- How to use them: If you have been using the plugin for a long time and have a big list, you can click “Today” to only see things that happened in the last 24 hours. It helps you keep track of recent activity.
Bulk Actions
If you end up with a long list of blocked bots and want to clean it up, you can use the Bulk Action menu.
- How to use it: Select the items you want to change from the list.
- Choose an action: Pick what you want to do with them (like Delete).
- Apply: Click the Apply button to make it happen.
Think of this page as the Bouncer at a club. If someone shows up with a name tag you don’t like, the Bouncer stops them at the door
Email & Address Blacklist
Email Blacklist
This page helps you control who is allowed to sign up or interact with your website based on their email address.
Email Enable Blacklist
- By enabling this switch, you can add email addresses you want to block.
Blocking these email addresses
- Type the email address you want to ban. After typing the email, click the Submit button.
Blocked List
Below the input box, you will see a list area.
- Blocked emails will appear in this list. You can check this list to see which email addresses are currently banned.
- You can delete the email address from the block list.
- Use the search box at the top right to find email addresses fast. You can also tap the refresh button to update your block list right away
- Once deleted, that person will be able to sign up again.
Address Blacklist
Block certain addresses at forms and checkout to keep your store safe.

Enable Address Blacklist
At the very top of the page, you will see a switch labeled “Enable Address Blacklist.” This activates the protection.
Similarity Percentage
Below the main switch, you will see a setting called Similarity Percentage, set to 60%.

- This setting tells the plugin: “If a new address looks more than 60% like a blacklisted address, block it.”
Adding a Suspicious Address
In the middle of the page, you will see a form to add address.
Enter the details of the address you want to block.
- Address 1 & 2: The street address (Required).
- City: The city name (Required).
- State: The state or region (Required).
- Postcode: The zip or postal code (Required).
- Country: The country (Required).
NB: Once you have filled in the boxes, click the Add to Blacklist button. That address is now banned.
Viewing Blocked Addresses
The bottom part of the page shows the history of what has happened.
- Time Filters: You can click Today, Last 7 days, or This Month to see only the activity from that specific time.
- The Table: The table shows the details (Address, City, State, Postcode) of any addresses that have been flagged.
At the very bottom of the page, you will see action buttons to apply settings.
- Save Changes or Discard Changes


