This setting allows you to set rules for passwords on your website. By enforcing these rules, you make sure that all users create strong, hard-to-guess passwords.

Enable Password Policies
You will see the main option labeled “Enable password policies.”

- This is the switch for this entire page.
- If you turn this off, none of the password rules below will apply to your users.
Quick Presets
Below the main switch, you will see a row of tabs labeled “Quick presets.” These are shortcuts to quickly set how strict you want the password rules to be. The available tabs are

- Basic: Sets simple, easy-to-follow rules.
- Strong: Sets stricter rules for better security.
- Enterprise: Sets the highest level of security for professional environments.
NB: Clicking one of these tabs automatically fills in the settings below (like length and character types) to match that level of security.
Minimum Length

Under the presets, you will find the setting for “Minimum length.”
- This controls how many characters a password must have.
- You can adjust the number (e.g., 8, 12, 16) to make passwords shorter or longer.
Require Uppercase & Lowercase
Next, there is a checkbox labeled “Require uppercase & lowercase.”

- It means users cannot use all lowercase letters. They must be mixed in capital letters
Require Numbers
Below that, there is a checkbox labeled “Require numbers.”

- It means users must include at least one number in their password.
Require Special Characters
Finally, there is a checkbox labeled “Require special characters.”

- What this means: Users must include at least one special symbol (like !, @, #, $, or %) in their password.
Exclude Characters
Located right below the “Require special characters” option, you will see an input box.

- While you force users to use special characters, you might want to ban specific ones that cause technical problems or are hard to type.
- If you type characters into this box (like ” ‘), users will not be allowed to use those specific symbols in their passwords.
Password History
Next, you will see the setting for “Password history.”

- This is set to 1 by default
- This stops users from reusing their old passwords. A setting of “1” means a user cannot reuse their most recent password. They must pick a new one. If you set it to “5,” they couldn’t reuse their last 5 passwords.
Expiration Period
Below that, there is an option labeled “Expiration period.”

- This makes users pick a new password after a certain amount of time.
- Setting it to “0” (zero) means passwords never expire. Users can keep their password forever. If you want them to change it every 3 months or even in a year, you would enter “3” here and select the month/year near the box.
Warning Days
Next to the expiration setting, you will see “Warning days.”

- If you have an expiration period set, this setting warns the user before their password runs out.
- Setting any number means the user will receive a notice before their password expires, reminding them to update it.
Grace Period
Below the warning days, there is the “Grace period” setting.

- This gives users a few extra chances to log in after their password has technically expired.
- Setting any number means the user can still log in for the certain number of days after the expiration date. During this time, the site will usually force them to pick a new password immediately. After the days are over, they are locked out completely.
Email Notification
You will see a toggle switch labeled “Email notification.”

- The system will automatically send emails to users regarding their password.
- This ensures users get notified about upcoming expirations or required changes without you having to tell them manually.
First Login Reset
At the bottom of this section, there is a toggle labeled “First login reset.”

- This is useful for new accounts. When you create a new user and they log in for the very first time, the system will force them to change their password immediately.
- This ensures that only the actual user knows their password, not the admin who created the account
Disable Self-Service Reset
You will see a toggle switch labeled “Disable self-service reset.”

- Normally, users can click a “Lost your password?” link to reset their own password via email. By turning this on, you are disabling that feature.
- This is useful for high-security sites where you want to personally verify who is asking for a password reset. It prevents hackers from trying to take over accounts by using the reset tool.
Custom Reset Message
Below the toggle, there is a text box labeled “Custom reset message.

- The box currently contains the text “Contact site administrator to reset your password.”
- What this means: Since the standard reset link is now hidden, this is the message users will see instead.
- You can type any instructions you want here. For example, you could provide an email address telling users exactly how to reach you to get their password fixed.
Custom Reset URL
Next, there is an input field labeled “Custom reset URL.”

- What this means: If you have created a specific custom page or form on your website for users to request help, you can paste that link here.
- If you do not have a custom page, you can leave this as is. If you enter a URL, the system might redirect users to that specific page when they try to reset their password.
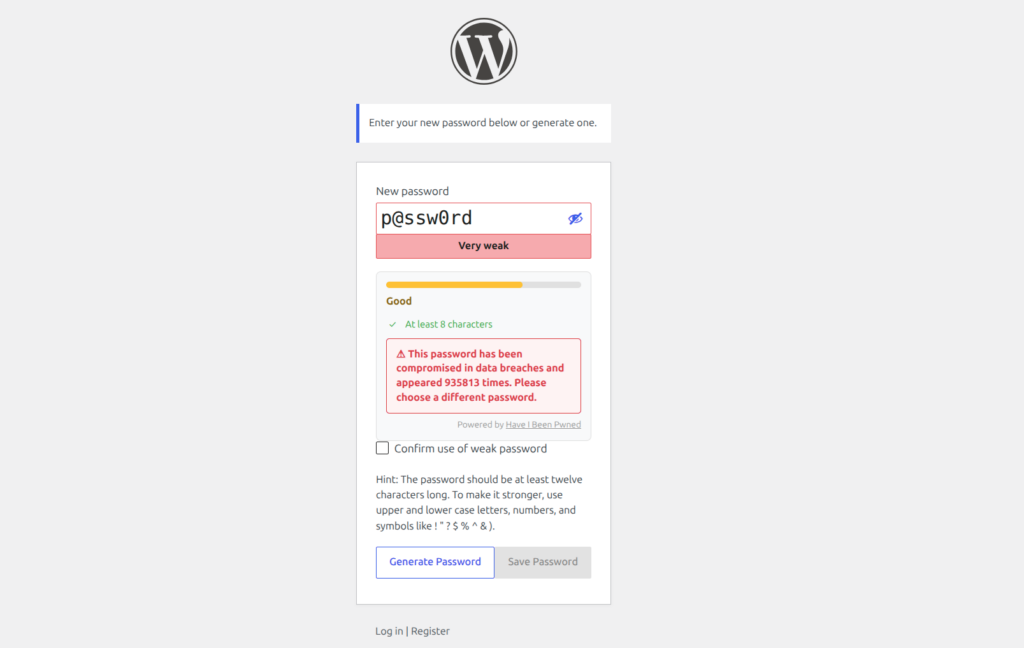
Refuse Compromised Passwords
This feature checks user passwords against a massive database of known leaked credentials in real-time. If a user tries to use a compromised password during registration, profile updates, or a password reset, the system instantly blocks it and forces them to choose a safer alternative.

Uses the trusted Have I Been Pwned database to automatically reject passwords that hackers already know from past data breaches
What the User Sees
When a user attempts to set a password that exists in the data breach database, the plugin injects a real-time warning box. The system explicitly states exactly how many times the chosen password has appeared in public data leaks. This visually proves to the user why their password is safe to reject.
Save or Discard Changes
- At the very bottom of the page, you will see buttons to control your settings.


